Now Reading: 3 Proven Methods to Create Stunning Websites with Cursor AI: A Developer’s Tutorial
-
01
3 Proven Methods to Create Stunning Websites with Cursor AI: A Developer’s Tutorial
Are you tired of AI-generated websites that look bland and generic? You’re not alone. As AI coding tools like Cursor AI become increasingly popular, many developers struggle to create visually appealing designs. The problem isn’t the AI itself, but how it’s being used. This article explores AI website design with Cursor AI, sharing three proven methods to elevate your AI-generated websites into stunning, professional-grade UIs.
I wrote this tutorial specifically for my audience. The developer who’s tired of templates that all look the same and wants to actually build something beautiful. Whether you’re just starting with AI coding or already deep into automation workflows, you’ll learn how to use AI to design websites that feel crafted, not generated. These are practical, tested strategies to help you design faster and better.
Understanding Design System Cloning: Method #1
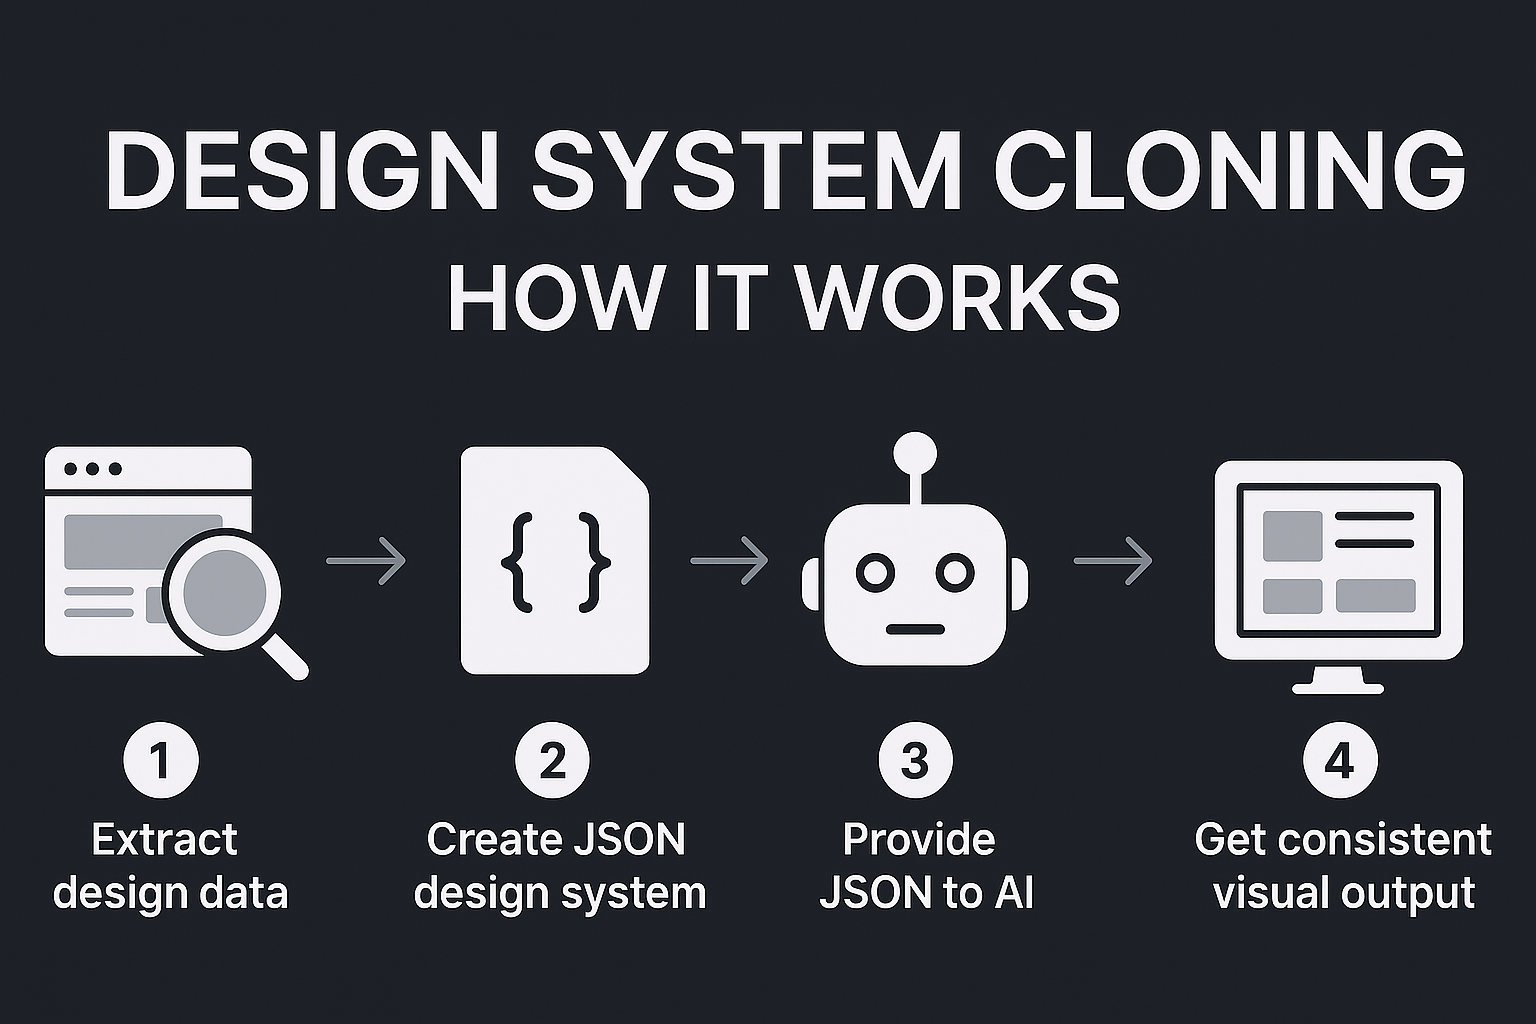
One of the most effective ways to create visually consistent and appealing websites is by cloning existing designs. This method involves extracting a design profile from a source and replicating it using AI. The key is to provide the AI with a comprehensive design system, rather than simply asking it to “make it pretty.”
The Power of Design Profiles
A design profile captures the visual data of a website or application, including colors, typography, spacing, and component styles. By creating a JSON design system, you can provide AI tools like Cursor AI with the information needed to replicate a specific design accurately.
- Explanation of design system extraction: Design system extraction involves analyzing a target design and identifying its key visual elements.
- Process of creating JSON design systems: This process involves converting the extracted design elements into a structured JSON format that AI tools can understand.
- Benefits of systematic design replication: Systematic design replication ensures consistency and visual harmony across your website, creating a professional and polished look.
Implementation Guide
To implement design system cloning, follow these steps:
- Extract design data: Use tools or manual analysis to extract the visual data from your target design.
- Create a comprehensive JSON design system: Convert the extracted data into a JSON format, specifying colors, typography, spacing, and component styles. Best practices for creating design system JSON schemas focus on using clear structure, modular component definitions, and robust token management.
- Provide the JSON file to Cursor AI: Instruct Cursor AI to build your project using the provided JSON file as a design guide.
- Case study: In the video, an educational dashboard was created using this method. The AI was instructed to build the app in HTML, CSS, and JavaScript, following the design.json file. The result was a beautiful-looking app that closely matched the target design, with clean notifications, an attractive layout, and a sleek navigation bar.
- Technical implementation with Cursor AI: Paste the JSON code into Cursor AI and instruct it to follow the design. The AI will then generate code that adheres to the specified design system.
Customizing with TweakCN: Method #2
Creating original designs can be challenging, especially when starting from scratch. TweakCN is a powerful tool that allows you to create your own perfect Shad CN UI setup from scratch. Shad CN UI is an open-source collection of customizable React components built using Radix UI primitives and styled with Tailwind CSS.
Introduction to Shad CN UI
Shad CN UI provides developer-friendly building blocks that you can own and control, making it highly adaptable for custom design systems and scalable projects.
- Overview of the framework: Shad CN UI is a collection of accessible, customizable React components.
- Benefits of component-based design: Component-based design promotes reusability, maintainability, and consistency across your website.
- Integration with modern development workflows: Shad CN UI integrates seamlessly with modern development workflows, allowing you to build high-quality UIs quickly and efficiently.
Customization Features
TweakCN allows you to customize various aspects of your UI, including colors, typography, and shadows.
- Color system management: TweakCN provides options for customizing primary, accent, base, and card colors.
- Typography customization: You can change the fonts used in your UI to match your project’s vibe.
- Shadow and effect controls: TweakCN allows you to adjust the shadows of components, giving you complete control over the visual appearance.
- Theme management (light/dark modes): TweakCN provides previews for both light and dark modes, ensuring your app looks great in both themes.
- Real-world implementation examples: The video demonstrates how to shuffle the default options to create different types of customizations and themes.
To implement TweakCN in your project:
- Customize your UI using the TweakCN interface.
- Copy the generated code.
- Paste the code into an index.css file in your project directory.
- Instruct Cursor AI to build your project from this file.
Premium Components Integration: Method #3
Taking your apps to the next level involves integrating premium components. React component libraries, such as React Bits, offer animated UI components that can significantly enhance the visual appeal of your website.
React Bits Library
React Bits provides animated React components that can add a creative and eye-catching touch to your UI.
- Overview of animated components: React Bits offers a variety of animated components, including tinted cards, text animations, and motion elements.
- Comparison with traditional UI libraries: Unlike traditional UI libraries, React Bits focuses on providing animated, visually distinct components.
- Implementation process and best practices: Implementing React Bits components involves installing the library, importing the desired components, and configuring them using props.
Component Integration Guide
Integrating premium components into your project involves the following steps:
- Installation and setup: Install the React Bits library using npm or yarn.
- Error handling and troubleshooting: When integrating components, you may encounter errors related to dependencies or styling. Consult the library’s documentation for troubleshooting tips.
- Case study: The video demonstrates how to integrate a tinted card component from React Bits into a landing page. The component adds a 3D tilting effect to the cards, making them more visually appealing.
- Performance considerations: Animated components can impact performance, so it’s essential to optimize their implementation. Use techniques such as lazy loading and requestAnimationFrame to improve performance.
To integrate a React Bits component into your project:
- Install the React Bits library.
- Copy the code for the desired component.
- Install any required dependencies, such as framer-motion. Framer Motion is a leading animation library for React, providing production-ready, declarative APIs to create smooth, interactive UI animations and transitions.
- Instruct Cursor AI to use the component in your project.
Essential Design Enhancement Techniques
Beyond the three core methods, several essential techniques can further enhance the design of your websites.
Animation Best Practices
Animations can add a touch of polish to your website, but it’s essential to use them sparingly and strategically.
- Golden rules for web animations: Don’t overdo it. Use animations to enhance the user experience, not to distract from it.
- Micro-interactions implementation: Micro-interactions are small, subtle animations that provide feedback to user actions.
- Framer Motion integration: Framer Motion is a popular animation library for React that provides a declarative API for creating smooth, interactive animations.
- Common pitfalls to avoid: Avoid using animations that are too flashy or distracting. Focus on creating subtle, elegant animations that enhance the user experience.
Typography Optimization
Typography plays a crucial role in the visual appeal of your website. Choosing the right fonts can significantly elevate your design.
- Google Fonts integration: Google Fonts provides a vast library of free fonts that you can use in your projects.
- Font selection strategies: Choose fonts that match your project’s vibe and complement the overall design.
- Implementation techniques: Use CSS to apply fonts to your website.
- Impact on visual hierarchy: Use different font sizes and styles to create a clear visual hierarchy.
Responsive Layout Design
Responsive layout design ensures that your website looks great on all devices, from desktops to smartphones.
- Bento grid system implementation: The bento grid system organizes content into distinct, visually balanced compartments or blocks.
- Mobile-first approach: Design your website for mobile devices first, then adapt it for larger screens.
- Layout adaptation techniques: Use CSS media queries to adapt your layout to different screen sizes.
- Performance considerations: Optimize your layout for performance by using techniques such as lazy loading and image optimization.
Advanced Implementation Tips
To further refine your AI-assisted web design process, consider these advanced implementation tips.
Error Prevention and Debugging
Preventing errors and debugging efficiently are crucial for a smooth development process.
- Common integration challenges: Be aware of common challenges such as dependency conflicts and styling issues.
- Solution strategies: Consult documentation, use debugging tools, and seek help from online communities to resolve issues.
- Testing methodologies: Implement thorough testing methodologies to ensure your website functions correctly and looks great on all devices.
- Performance optimization: Optimize your website for performance by using techniques such as code minification and caching.
Design System Maintenance
Maintaining a design system ensures consistency and scalability across your projects.
- Version control best practices: Use version control systems like Git to track changes to your design system.
- Documentation requirements: Document your design system thoroughly to ensure that all team members understand how to use it.
- Team collaboration strategies: Use collaboration tools to facilitate communication and collaboration among team members.
- Future-proofing implementations: Design your design system to be flexible and adaptable to future changes.
Conclusion
Creating stunning websites with Cursor AI requires a strategic approach that goes beyond simply asking the AI to “make it pretty.” By implementing the three proven methods outlined in this article – design system cloning, TweakCN customization, and premium component integration – you can elevate your AI-generated designs to a professional level.
Remember to focus on essential design enhancement techniques such as animation best practices, typography optimization, and responsive layout design. By following these guidelines, you can create websites that are not only visually appealing but also functional and user-friendly. Try these methods in your own projects and witness the transformative impact they can have on your web design endeavors.